A gentle introduction to deploying apps
Deploying web applications has never been easier. Modern platforms can take a Git push and have your app live on a global network in seconds, so developers can focus on what actually matters: the architecture, writing code and optimizing it, not worrying about how it gets to production.
But those platforms didn't replace the fundamentals, they automated them. Under the hood there's still Git, DNS, TLS, web servers and reverse proxies. And many of the "classic" tools are very much alive: cPanel is still everywhere in shared hosting, including with many local hosts, and a VPS running Nginx is still how plenty of teams run production.
In this two-part series, part one covers those foundations: version control, how the web talks, web servers and stacks, domains, Cloudflare, managed hosting and tunnels. Part two covers the newer platforms that automate most of it. Understanding part one will make part two much easier to debug when something goes wrong.
The basics: version control
Version control is a system that tracks and manages changes to files and code over time. The most popular version control system (VCS) is Git, which was created by Linus Torvalds, the creator of Linux.
GitHub is a website and cloud service, built around Git, where people store, share and collaborate on code. Each project lives in a repository ("repo") that holds the code along with its full history. Developers can copy a repo, make changes on their own branch, and then propose those changes back to the original project through a pull request.
GitHub is the largest home for open-source software in the world, and many well-known projects, from programming languages to apps, are developed publicly there.
Your first repository
Install Git from https://git-scm.com/install/, then create a project folder and move into it:
mkdir -p work/blog/git && cd work/blog/gitInitialize a Node.js project and a Git repository:
npm initgit init .Create a file called index.ts with some code in it:
// 1. Defining variables with explicit types
let userName: string = "Alice";
let userAge: number = 30;
let isSubscriber: boolean = true;

// 2. Creating a function with typed parameters and a typed return value
function greetUser(name: string, age: number): string {
    return `Hello ${name}! You are ${age} years old.`;
}

// 3. Executing the code
const greetingMessage = greetUser(userName, userAge);
console.log(greetingMessage);
Check which files Git sees as new or changed:
git statusStage the file, then commit it:
git add index.tsgit commit -m "this is a first commit"Run git status again and you'll see the working tree is clean:
git statusPushing to GitHub with the GitHub CLI
Install the GitHub CLI from https://cli.github.com/, then log in:
gh auth loginCreate the repository. The interactive prompt lets you choose "Push an existing local repository to GitHub", which uploads the commit you just made:
gh repo createYour code is now live at https://github.com/yourusername/your-repo.
How the web talks: HTTP, HTTPS and DNS
HTTP and HTTPS
Web servers are probably some of the most exposed servers in the world. Their main job is serving HTTP (Hypertext Transfer Protocol) requests. HTTP follows a client-server model: the browser (client) sends a request and the server sends back a response.
Plain HTTP is insecure and discouraged, because traffic travels unencrypted and attacks such as man-in-the-middle become possible.
HTTPS (Hypertext Transfer Protocol Secure) is the industry standard. It is HTTP running over TLS (Transport Layer Security), which encrypts the data travelling between the client and the server.
You will also hear about SSL (Secure Sockets Layer). SSL is TLS's older predecessor and is now deprecated, so always use TLS, even though people still casually say "SSL certificate".
The Domain Name System (DNS)
DNS translates human-readable domain names into IP addresses so computers can find each other on the internet. Think of it as the internet's phonebook.
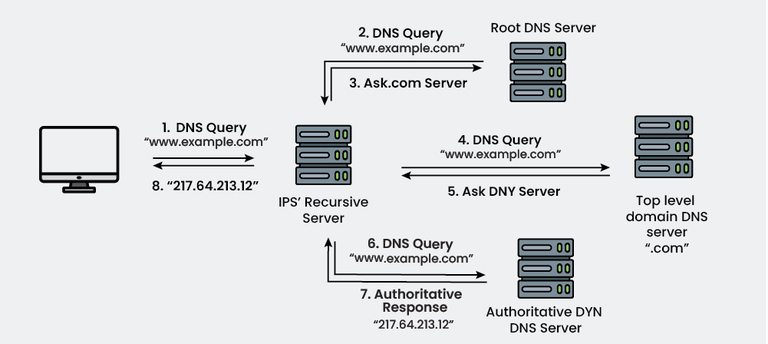
The DNS hierarchy
- Top-level domains (TLDs): the level directly below the root, which defines domain extensions such as
.comor.tz. - Second-level domains: the main name an organization registers. It appears before the TLD (e.g.
exampleinexample.com) and is unique under that TLD. - Subdomains: extensions of the main domain used for organization, such as
www,mailorblog. - Hostnames: identify specific servers or devices within a domain, such as
web1,mailserverorftp. They map to actual IP addresses through DNS records.
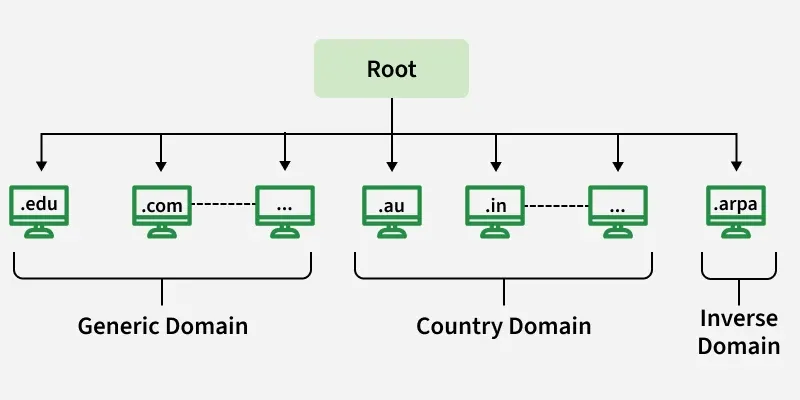
Types of domains
- Generic domains (gTLDs) such as
.com,.organd.netare not tied to any country and are used for commercial, organizational and educational purposes. - Country code domains (ccTLDs) represent specific countries or regions, for example
.tz(Tanzania),.in(India),.us(USA),.uk(UK) and.jp(Japan). They are managed by national authorities; in Tanzania that is TCRA (e.g. karibu.tz). - Reverse DNS maps IP addresses back to domain names. IPv4 uses
in-addr.arpa, IPv6 usesip6.arpa, and both rely on PTR (pointer) records.
Domain name servers
A domain name server stores DNS records and answers queries that resolve domain names into IP addresses. It:
- stores records such as A, AAAA, MX, CNAME, NS and PTR,
- responds to queries from clients or other DNS servers,
- operates within the hierarchical DNS structure,
- can act as a recursive resolver or as an authoritative server.
DNS lookup (or DNS resolution) is the process of converting a domain name into its IP address so a device can connect to the target server.
Common DNS record types
- A: maps a domain name to an IPv4 address.
- AAAA: maps a domain name to an IPv6 address.
- CNAME: creates an alias that points one domain name to another.
- MX: specifies the mail server that receives email for the domain.
- TXT: stores text, used for domain verification and email authentication (SPF, DKIM, DMARC).
- NS: lists the authoritative name servers for the domain.
- PTR: maps an IP address back to a name (used in reverse DNS).
Web servers and tech stacks
Apache
Who doesn't love Apache? It was the first web server I ever used, through XAMPP. XAMPP bundles everything you need to start building web apps with PHP and MySQL, and on Windows that gives you a stack called WAMP: Windows, Apache, MySQL, PHP.
- Windows is the operating system your application runs on (on Linux the same stack is called LAMP).
- Apache is the web server.
- MySQL is the database.
- PHP is the server-side scripting language, which talks to the database to make the web app dynamic.
PHP
PHP is probably one of the most famous programming languages on the web. According to W3Techs, around 70% of websites whose server-side language is known use PHP. It has great frameworks like Laravel and content management systems like WordPress.
PHP is a dynamic language. It runs on the server, can build CLI apps, pairs very well with Apache, and can talk to many databases: MySQL, SQLite, PostgreSQL, MSSQL, and NoSQL databases like MongoDB.
$conn = new mysqli("localhost", "dbuser", "dbpass", "db");
$result = $conn->query("SELECT * FROM users ORDER BY id DESC");
$row = $result->fetch_assoc(); // good old associative array of key-value pairs
printf("%s (%s)\n", $row["last_name"], $row["age"]);
Over the last decade or so, a lot of PHP web applications turned out to be vulnerable because of code like this:
// Vulnerable: user input is glued straight into the query
$conn->query("SELECT * FROM users WHERE id = " . $_GET['id']);

// Secure: a prepared statement keeps data separate from the SQL
$stmt = $conn->prepare("SELECT * FROM users WHERE id = ?");
$stmt->bind_param("i", $_GET['id']);
$stmt->execute();
$result = $stmt->get_result();
The first query is a classic SQL injection vulnerability, which can give an attacker pretty much full access to your database. PHP applications have also suffered badly from other vulnerabilities such as unrestricted file uploads (leading to remote code execution and full server takeover), IDOR and path traversal. These are mistakes in application code rather than flaws in the language itself, but PHP's popularity made them very common.
Popular tech stacks: LAMP, MEAN and MERN
A tech stack is the set of technologies that work together to run a web app: an operating system or runtime, a web server, a database and the language or framework the app is written in. Stacks are usually named after the first letters of their parts. Three of them are especially well known.
LAMP
- Linux: the operating system.
- Apache: the web server.
- MySQL (or MariaDB): the relational database.
- PHP: the server-side language (sometimes Perl or Python instead).
This is the classic stack behind WordPress, most shared hosting and countless cPanel sites. It is the Linux version of the WAMP stack we got from XAMPP. If you swap Apache for Nginx you get LEMP (the "E" comes from "engine-x").
Deploying LAMP is simple: Apache serves your .php files directly, so you mostly upload the code and point Apache at the folder.
MEAN and MERN
These stacks use JavaScript everywhere, in the browser and on the server, with data moving between them as JSON.
- MongoDB: a NoSQL database that stores JSON-like documents instead of tables.
- Express: a lightweight web framework for Node.js that handles routes and APIs.
- Angular (MEAN) or React (MERN): the frontend framework that runs in the browser.
- Node.js: the runtime that runs JavaScript on the server.
The only difference is the frontend: MEAN uses Angular and MERN uses React. Swap in Vue and you get MEVN.
Here's a tiny Express API backed by MongoDB, the backend half of a MERN app:
const express = require("express");
const mongoose = require("mongoose");

const app = express();
app.use(express.json());

const User = mongoose.model("User", { name: String, age: Number });

app.get("/api/users", async (req, res) => {
  const users = await User.find().sort({ _id: -1 });
  res.json(users); // JSON straight to the React frontend
});

mongoose.connect("mongodb://127.0.0.1:27017/db").then(() => {
  app.listen(3000, () => console.log("API running on :3000"));
});
And just like PHP had SQL injection, MongoDB apps have NoSQL injection. Passing req.body straight into a query lets an attacker send something like { "password": { "$ne": null } } and log in without knowing the password. Validate and sanitize input, whatever your database is.
How they are deployed
A MERN app is deployed differently from LAMP:
- The React frontend is built into static files (
npm run build), which any web server or CDN can serve. - The Node/Express backend runs as a long-lived process on a port like
3000, kept alive by a process manager such aspm2or asystemdservice. - Nginx sits in front: it serves the static frontend and reverse-proxies
/apirequests to Node.
Browser
   |
   v
Nginx :80/:443
   |-- /       -> React build (static files)
   |-- /api    -> proxy_pass -> Node/Express :3000 -> MongoDB :27017
Quick comparison
| Stack | Frontend | Backend | Database | Language |
|---|---|---|---|---|
| LAMP | Server-rendered PHP | Apache + PHP | MySQL / MariaDB | PHP |
| MEAN | Angular | Node.js + Express | MongoDB | JavaScript / TypeScript |
| MERN | React | Node.js + Express | MongoDB | JavaScript / TypeScript |
That reverse proxy role is exactly what Nginx is great at, so let's look at it next.
Nginx
Nginx, pronounced "engine-x", is another web server and Apache's main contender.

It can do pretty much everything Apache can, and it is especially popular as a reverse proxy: it sits in front of your web apps and forwards requests to them, which is useful for apps that don't expose HTTP/HTTPS publicly themselves.
Installation guide: https://docs.nginx.com/nginx/admin-guide/installing-nginx/installing-nginx-open-source/
Update your packages and install Nginx:
sudo apt update && sudo apt upgrade -ysudo apt install nginx -yCheck, start or stop the service:
sudo systemctl status nginx
sudo systemctl start nginx
sudo systemctl stop nginx
To serve PHP, install PHP-FPM:
sudo apt install php-fpm -yThen create a test page (you'll also need to enable the PHP location block in your Nginx site config so .php files are passed to PHP-FPM):
sudo tee /var/www/html/index.php > /dev/null << 'EOF'
<?php
phpinfo();
?>
EOF
Setting up a reverse proxy
Here's how a request flows when Nginx proxies to a Python app (see also this guide on TheServerSide):
Browser
   |
   | https://app.example.co.tz/
   v
Nginx :80
   |
   | proxy_pass
   v
Python :8080
   |
   v
app.py
Create a config file for the site:
sudo nano /etc/nginx/sites-available/app.example.co.tzserver {
listen 80;
server_name app.example.co.tz;
location / {
proxy_pass http://127.0.0.1:8080/;
proxy_set_header Host $host;
proxy_set_header X-Real-IP $remote_addr;
proxy_set_header X-Forwarded-For $proxy_add_x_forwarded_for;
proxy_set_header X-Forwarded-Proto $scheme;
}
}Enable the site by linking it into sites-enabled:
sudo ln -s /etc/nginx/sites-available/app.example.co.tz /etc/nginx/sites-enabled/Test the configuration, then reload Nginx:
sudo nginx -tsudo systemctl reload nginxFor app.example.co.tz to reach this server, its DNS A record must point to the server's IP address (see the DNS section above). But where does a domain like example.co.tz come from in the first place? Let's look at that next.
How to choose a good domain
Your domain is your address on the internet, and changing it later is painful: links break, emails bounce and people forget the new one. Take a few minutes to choose well.
Keep it short and easy to say
- Short beats clever.
duka.co.tzis easier to remember thanbest-online-duka-tanzania.co.tz. - Avoid hyphens and numbers. When you say "my-shop2" out loud, people have to ask "dash or no dash? the number or the word?".
- Say it out loud. If you have to spell it every time you tell someone, pick another one. This matters even more when people might hear it in Swahili and type it in English, or the other way around.
- Read it without spaces. Some names turn into something embarrassing when the words run together, so check before you buy.
Use your brand, not keywords
Years ago people bought domains stuffed with keywords to rank on Google. That doesn't help much anymore. Use your project or business name, the one people will actually search for and remember.
Pick the right extension (TLD)
.co.tzis for Tanzanian businesses. It tells local customers you are here..or.tzis for NGOs and.ac.tzfor academic institutions..tz(e.g.example.tz) is the shorter second-level option. It is available now but costs noticeably more than.co.tz..comis still the most recognized if your audience is international..dev,.io,.appare popular for developer tools and tech products. Note that.devand.apponly work over HTTPS, because browsers enforce it for those extensions.
If your name is common, consider registering both the .co.tz and the .com and pointing them to the same site, so nobody else grabs the other one.
Do a quick background check
- Search the name to make sure it isn't someone else's trademark.
- Check whether the matching social media handles are free.
- Look the domain up on the Wayback Machine. If it was used before for spam or something shady, that reputation can follow you (for example into email spam filters).
Buying a domain
Registries and registrars
Two players are involved when you buy a domain:
- Registries are the wholesalers. They run the database for a TLD, set its rules and set the wholesale price. For example, Verisign runs
.com, and TCRA manages.tzin Tanzania. - Registrars are the shops you actually buy from. They set the retail price, take your payment and let you manage the domain.
You don't really "own" a domain. You rent it one year at a time (or several years at once), and you have to renew it or you lose it.
Where to buy
- For
.tzdomains you buy from a TCRA-accredited registrar, and most of them are local hosting companies. They usually accept mobile money (M-Pesa, Tigo Pesa and so on), which makes things easy if you don't have a card. - For
.com,.dev,.ioand other international TLDs you can use international registrars like Cloudflare Registrar, Namecheap or Porkbun. Local registrars sell these too, usually at a markup.
What to check before you pay
- The renewal price, not just the first-year price. Many registrars advertise a cheap first year and then charge much more to renew. Always look at the renewal price.
- WHOIS privacy. Without it, your name, phone number and email can end up in public WHOIS records. Most good registrars include it for free.
- Security. Turn on two-factor authentication and keep the domain lock (transfer lock) enabled, so nobody can move your domain away from you.
- Auto-renew. Turn it on and keep your payment details current. Losing a domain because a renewal email went to spam is a classic mistake.
- The domain is in your name. If a developer or agency buys it for you, make sure you or your company are the registered owner, and that you have the login. I've seen businesses lose their domain because the developer who registered it disappeared.
Transferring a domain later
If you want to move a domain to another registrar, you unlock it at the current one, request an auth code (EPP code), and give that code to the new registrar. Newly registered domains usually can't be transferred for the first 60 days.
Introduction to Cloudflare
Remember the reverse proxy we set up with Nginx? Cloudflare is like a giant reverse proxy that sits in front of your server, spread across data centers all over the world. Visitors talk to Cloudflare, and Cloudflare talks to your server.
Browser
   |
   | https://app.example.co.tz/
   v
Cloudflare edge (DNS, CDN, TLS, DDoS protection)
   |
   v
Your server (Nginx :80/:443)
   |
   | proxy_pass
   v
Python :8080
What you get on the free plan
- Fast DNS hosting for your domain.
- CDN: static files (images, CSS, JS) are cached close to your visitors.
- Free TLS certificates, so your site gets HTTPS without extra work.
- DDoS protection and basic bot filtering.
- Your server's IP stays hidden behind Cloudflare, as long as you proxy all your records.
For most personal projects and small businesses, the free plan is plenty.
Adding your domain to Cloudflare
- Create a free account at https://dash.cloudflare.com/sign-up
- Click Add a domain and enter your domain, for example
example.co.tz. - Cloudflare scans your existing DNS records and imports them. Review them carefully so nothing (especially your MX records for email) goes missing.
- Cloudflare gives you two nameservers, something like
ada.ns.cloudflare.comandbob.ns.cloudflare.com. - Log in to the registrar where you bought the domain (your local registrar for a
.co.tz) and replace the existing nameservers with Cloudflare's. - Wait for the change to spread. It often takes minutes, but it can take up to 24–48 hours.
You can check whether the nameservers have switched with dig:
dig NS example.co.tz +shortPointing your domain to your server
In the Cloudflare dashboard, go to DNS → Records and add an A record for the app we set up with Nginx earlier:
| Type | Name | Content | Proxy status |
|---|---|---|---|
| A | app | YOUR_SERVER_IP | Proxied |
Check that it resolves:
dig app.example.co.tz +shortIf the record is proxied, you'll see Cloudflare's IP addresses instead of your server's, which is expected.
Orange cloud vs grey cloud
Every DNS record has a proxy toggle:
- Proxied (orange cloud): traffic goes through Cloudflare, so you get the CDN, TLS, DDoS protection and a hidden server IP.
- DNS only (grey cloud): Cloudflare only answers the DNS query, and visitors connect straight to your server.
Use proxied for your websites. Use DNS only for things that aren't normal web traffic, like SSH to your server or mail server records.
Choose the right SSL/TLS mode
This is the setting people most often get wrong. Under SSL/TLS → Overview you'll see several modes:
- Flexible: HTTPS between the visitor and Cloudflare, but plain HTTP between Cloudflare and your server. The padlock shows up, but half the journey is unencrypted. Avoid it.
- Full: encrypted all the way, but Cloudflare doesn't check your server's certificate.
- Full (strict): encrypted all the way, and Cloudflare verifies the certificate. This is the one you want.
For Full (strict), your server needs a valid certificate. You can get one from Let's Encrypt with Certbot, or generate a free Origin Certificate in the Cloudflare dashboard (SSL/TLS → Origin Server) and install it in Nginx.
One gotcha: real visitor IPs
Once Cloudflare is in front, Nginx sees every request as coming from Cloudflare's IPs rather than the visitor's. Cloudflare sends the real visitor IP in the CF-Connecting-IP header. If your logs or rate limiting depend on visitor IPs, configure Nginx's real_ip module to trust Cloudflare's IP ranges and read that header.
Managed hosting with cPanel
Setting up your own server with Nginx, like we did above, gives you full control, but you are also responsible for everything: security updates, backups, firewalls, email and fixing things at 2 a.m. when they break.
With managed (shared) hosting, the hosting company runs the server for you. You get a web-based control panel where you upload your code, create databases, set up email and manage domains. The most popular control panel by far is cPanel (others include Plesk and DirectAdmin).
Why people still use it:
- It's cheap, and many local hosts accept mobile money and bundle a free
.co.tzdomain for the first year. - Email, databases, backups and free TLS (AutoSSL) are included.
- You don't need to know Linux administration to get a site online.
The trade-offs:
- You share the server with other customers, so CPU and memory are limited.
- You don't get root access, so you can't install whatever you want.
- Long-running processes, background workers and WebSockets may be restricted, depending on the host.
Connecting your domain
When you buy hosting, your host gives you nameservers (e.g. ns1.yourhost.co.tz) and a server IP address, which cPanel shows in the sidebar under Shared IP Address. You have two options:
- Use the host's nameservers: set them at your registrar, and the host manages your DNS.
- Keep Cloudflare: leave your nameservers at Cloudflare and point an A record for your domain to the hosting IP. AutoSSL gives the server a valid certificate, so you can use Full (strict) mode.
Extra domains are added under Domains, and each one gets its own document root, the folder its files are served from.
Serving PHP apps in cPanel
PHP is what cPanel was built for, so this is the easiest case. Your main domain serves files from public_html.
1. Upload your code. You have three ways:
- File Manager: upload a
.zipof your project and use Extract. This is much faster than uploading files one by one. - FTP/SFTP: create an account under FTP Accounts and connect with a client like FileZilla.
- Git Version Control: clone your GitHub repo straight into cPanel. Add a
.cpanel.ymlfile to your repo and cPanel will copy files topublic_htmlevery time you deploy:
---
deployment:
  tasks:
    - export DEPLOYPATH=/home/cpaneluser/public_html/
    - /bin/cp -R *.php $DEPLOYPATH
2. Pick your PHP version. Use MultiPHP Manager to choose the PHP version for each domain, and MultiPHP INI Editor for settings like upload_max_filesize or memory_limit.
3. Create a database. Open MySQL Database Wizard to create a database and a user, then give that user All Privileges on the database. cPanel adds your account name as a prefix, so db becomes something like cpaneluser_db:
$conn = new mysqli("localhost", "cpaneluser_dbuser", "dbpass", "cpaneluser_db");You can manage the data with phpMyAdmin, also in cPanel.
WordPress is even simpler: most hosts include a one-click installer such as Softaculous or WP Toolkit.
Laravel and other frameworks need one extra step: the domain's document root must point to the framework's public/ folder, not the project root, otherwise files like .env can be downloaded by anyone. Upload the project outside public_html (e.g. /home/cpaneluser/laravel), then change the domain's document root to /home/cpaneluser/laravel/public under Domains. If your host provides Terminal or SSH access, you can run composer install and php artisan migrate there.
Serving Python apps in cPanel
Many hosts (those running CloudLinux) include a Setup Python App tool. It runs your app with Phusion Passenger, which talks to Python through WSGI, the standard interface between Python web apps and web servers.
1. Create the application. In Setup Python App, click Create Application and fill in:
- Python version: e.g. 3.11
- Application root: a folder outside
public_html, e.g.myapp - Application URL: the domain or path it will be served on
- Application startup file:
passenger_wsgi.py - Application entry point:
application
2. Add your code. A minimal Flask app:
# app.py
from flask import Flask

app = Flask(__name__)

@app.route("/")
def home():
    return "Hello from cPanel!"
And the file Passenger loads:
# passenger_wsgi.py
from app import app as application
For Django, point it at your project's WSGI module instead:
# passenger_wsgi.py
from myproject.wsgi import application
3. Install dependencies. At the top of the app's page, cPanel shows a command that activates the app's virtual environment. Copy it into Terminal (or SSH) and install your packages:
source /home/cpaneluser/virtualenv/myapp/3.11/bin/activate && cd /home/cpaneluser/myapp
pip install -r requirements.txt
You can also add requirements.txt in the interface and click Run Pip Install.
4. Restart after changes. Click Restart in the interface, or from the terminal:
touch /home/cpaneluser/myapp/tmp/restart.txtPassenger speaks WSGI, so ASGI frameworks like FastAPI need an adapter such as a2wsgi to run this way, and features like WebSockets won't work. For those apps, a VPS is usually a better fit.
Serving Node.js apps in cPanel
On the same kind of hosts, Setup Node.js App runs Node apps through Passenger too.
1. Create the application. Click Create Application and fill in:
- Node.js version: pick the latest LTS your host offers
- Application mode: Production
- Application root: e.g.
nodeapp, outsidepublic_html - Application URL: the domain or path it will be served on
- Application startup file: e.g.
app.js
2. Listen on the port Passenger gives you. Don't hardcode a port. Passenger decides it and passes it through process.env.PORT:
// app.js
const express = require("express");
const app = express();

app.get("/", (req, res) => res.send("Hello from cPanel!"));

app.listen(process.env.PORT || 3000);
3. Install dependencies. Upload your code with a package.json (without node_modules), then click Run NPM Install. Or copy the virtual environment command from the top of the page into Terminal and run npm install yourself.
4. Set environment variables such as database URLs and API keys in the Environment variables section of the app, instead of committing them to your code, then click Restart.
A few things to keep in mind for Node on shared hosting:
- Build frontends locally. Running
npm run buildfor a React app on shared hosting often hits memory limits. Build on your machine or in CI, then upload the staticbuild/distfolder topublic_html. - MongoDB isn't usually included. Shared hosting gives you MySQL, so a MERN app would connect to a hosted MongoDB service like MongoDB Atlas instead.
- WebSockets and background jobs may not work, depending on your host.
When to move beyond shared hosting
cPanel is great for websites, WordPress, PHP apps and small Python or Node APIs. Consider moving to a VPS (with Nginx, as we set up above) or a modern platform when:
- your app needs more CPU or memory than your plan allows,
- you need WebSockets, background workers or custom software,
- you want automatic deploys from every Git push, or
- your traffic outgrows a shared server.
Serving apps from your local machine
Back when we were doing cyber security, we often needed to expose a local port to the internet to catch a reverse shell. The ISP router didn't support port forwarding, and renting a server was expensive, so we improvised with tunneling tools like Portmap with OpenVPN, Serveo over SSH, LocalXpose or ngrok.
The same trick is handy for developers. Say you've built an app that runs on your machine and you want to share it with friends or your team. Instead of buying a full-fledged server just for testing, you can expose it through a tunnel.
ngrok
ngrok (pronounced "en-grok") is a developer tool that creates a secure public URL for a web server running on your computer.
Create an account at https://dashboard.ngrok.com/signup, then follow the quickstart: https://ngrok.com/docs/share-localhost/quickstart
Install ngrok (macOS):
brew install ngrokAdd your auth token:
ngrok config add-authtoken YOUR_TOKENStart your app:
python3 app.pyThen expose its port:
ngrok http 5000LocalXpose
LocalXpose (pronounced "local expose") is a reverse proxy and secure tunneling platform that exposes your local server, development environment or private network services to the internet: https://localxpose.io/
Install it:
npm install -g loclx
# or on macOS: brew install --cask localxpose
Log in:
loclx account login
Start a tunnel to your local app:
loclx tunnel http --to localhost:9090Cloudflare Tunnel
Since we just met Cloudflare, it's worth knowing it has its own tunneling tool, cloudflared, which works much like ngrok. For a quick test, it gives your local app a temporary public URL without an account:
cloudflared tunnel --url http://localhost:8080With an account and your own domain, you can set up a named tunnel that serves app.example.co.tz straight from your machine, without opening any ports.
What's next
That covers the foundations of getting an app online: version control, DNS, web servers and stacks, reverse proxies, domains, Cloudflare, managed hosting and tunnels. In part two we'll look at the newer platforms that deploy straight from a Git push and handle most of this for you, and you'll recognize every piece they are automating.